
“Our Comprehensive Services for Full Arch Cases”
FP3 AND FP1 CASES SUPPORT
- SMILE DESIGN
- DIAGNOSTIC DIGITAL WAX UP
- IMMEDIATE IN SURGERY CONVERSION
- DIAGNOSTIC WAX UP-CONVERTED TO A GALLUCCI GUIDE
- TEMPORARY MILLED REINFORCED PMMA TRY-IN
- FINAL BRIDGE DESIGN
- FULL ARCH ZIRCONIA
- BRIDGE BASE TITANIUM FRAME WITH PMMA SLEEVE OR ZIRCONIA SLEEVE
- THIMBLE BRIDGE WITH SINGLE CROWNS ON TITANIUM FRAME
“To ensure top-tier technical support, we have established a specific protocol that outlines the necessary steps for optimal communication and outstanding outcomes.”
Photographs
“It is imperative that you provide high-resolution photos along with intra-oral scans for our evaluation.”


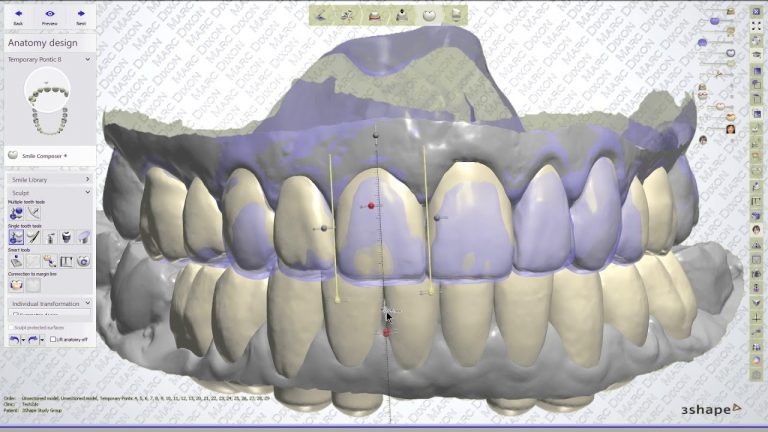
Smile Design
“Utilising smile design is a valuable method for determining whether a case qualifies as FP1 or FP3 through a facially driven planning approach to evaluate the optimal tooth position in the context of the face. You have the option to perform this using 3Shape software or Smilecloud. Alternatively, we can assist you by providing a basic 2D design to facilitate the initial assessment. To ensure accurate evaluation, we require a minimum of high-resolution, full head frontal view photographs and full-smile images.”
The Stages.
- Inter-pupillary line to give the horizontal plane
- Drop a perpendicular line to determine the midline
- Determine the smile curve
- Place the central incisors
- Pace the rest of the teeth in the smile curve
- Assess the soft tissue contours in relation to the tooth position
- Make a diagnostic Wax up based on the facially driven plan

Digital wax-up and surgical stent
We will work from the smile design to provide you with a digital wax-up where we can then look at occlusion and guidance for the provisional. when this has been approved will continue on to making a Gallucci-style guide. We will place pilot holes in the teeth you indicated as the possible implant placement sights. The guide will be returned in digital format for you to mesh with the CT Scan, using Simplant, Exoplan or SMOP or we can do this for you.
When assessing this you should get an overall view of the situation and be able to check the distance between the gingival margin on the wax-up and the bone if this is less than 4 mm in most areas, you should be able to carry on with it an FP1 if not then the plan would be FP3
Once the implant position is set, you can have an implant Guide for surgery to be constructed.
We provide a Galluci Guide this is a way of combining the surgical guide and prosthetic shell for pick-up, we can design the pontic shape and the emergence profile before pick-up

Immediate placement surgery conversion support
Provisional Restoration will be adapted to the implant position on the day of surgery, We will work together to connect the temporary cylinders to the Gallucci Guide with a dual cure composite resin additional titanium wire is placed to aid with strength, when all the cylinders are connected the technician will work on shaping the bridge i.e. if FP1 working closely on the emergence profile and the pontic shapes for the soft tissue suturing for the ideal tissue contour.
Making the final restoration
“COPY THE PROVISIONAL TO FINAL”
The idea with this stage is to copy a well made provisional to a final restoration. The most constant way of doing this is to use an intra oral scanner.
Using a triple scan technique where you scan
- The prosthesis in situ (1)
- an abutment level scan with scanbodies (2)
- The provisional restoration outside the mouth (3)
and then combining these scans in the scanner software, or the lab software captures
- The vertical dimension from scan (1)
- The abutment position from scan (2)
- The soft tissue contours from scan (3).
Material for final restoration
MATERIALS FOR THE FINAL RESTORATION
- MONOLITHIC ZIRCONIA WITH STAIN
- TITANIUM/ZIRCONIA
- TITANIUM/COMPOSITE
- METAL CERAMIC
There are many options of materials for the final bridge. If the inter-implant distance is favourable, then option 1 is used. If there is a large interplant distance and adequate prosthetic space than option 2 is Used. If there is less prosthetic space, then composite is used instead of zirconia (option 3). be aware that if a titanium bar is used then the papilla tends to be a little more blunted (options 2 and 3)
Metal ceramic (option 4) can be made in thinner cross sections, with very aesthetic contours, but the materials are the least biocompatible of the options above.